- Mik Bromley

- Apr 30, 2025
- 5 min read
Updated: Jul 15, 2025
ℹ️ - Days Gone Remastered Lighting Guide
Along with headline features like the Horde Assault arcade survival and Permadeath modes, Days Gone Remastered includes several visual upgrades that are good news for virtual photographers. As well as greater draw distance and shadow quality, improvements have also been made to the all-important lighting.
The same goes for the already comprehensive photo mode that has been reworked with brand new lighting options. In this guide, you'll find everything you need to know about the lights and how to use them to get the best out of the Days Gone Remastered visuals.

Photo Mode
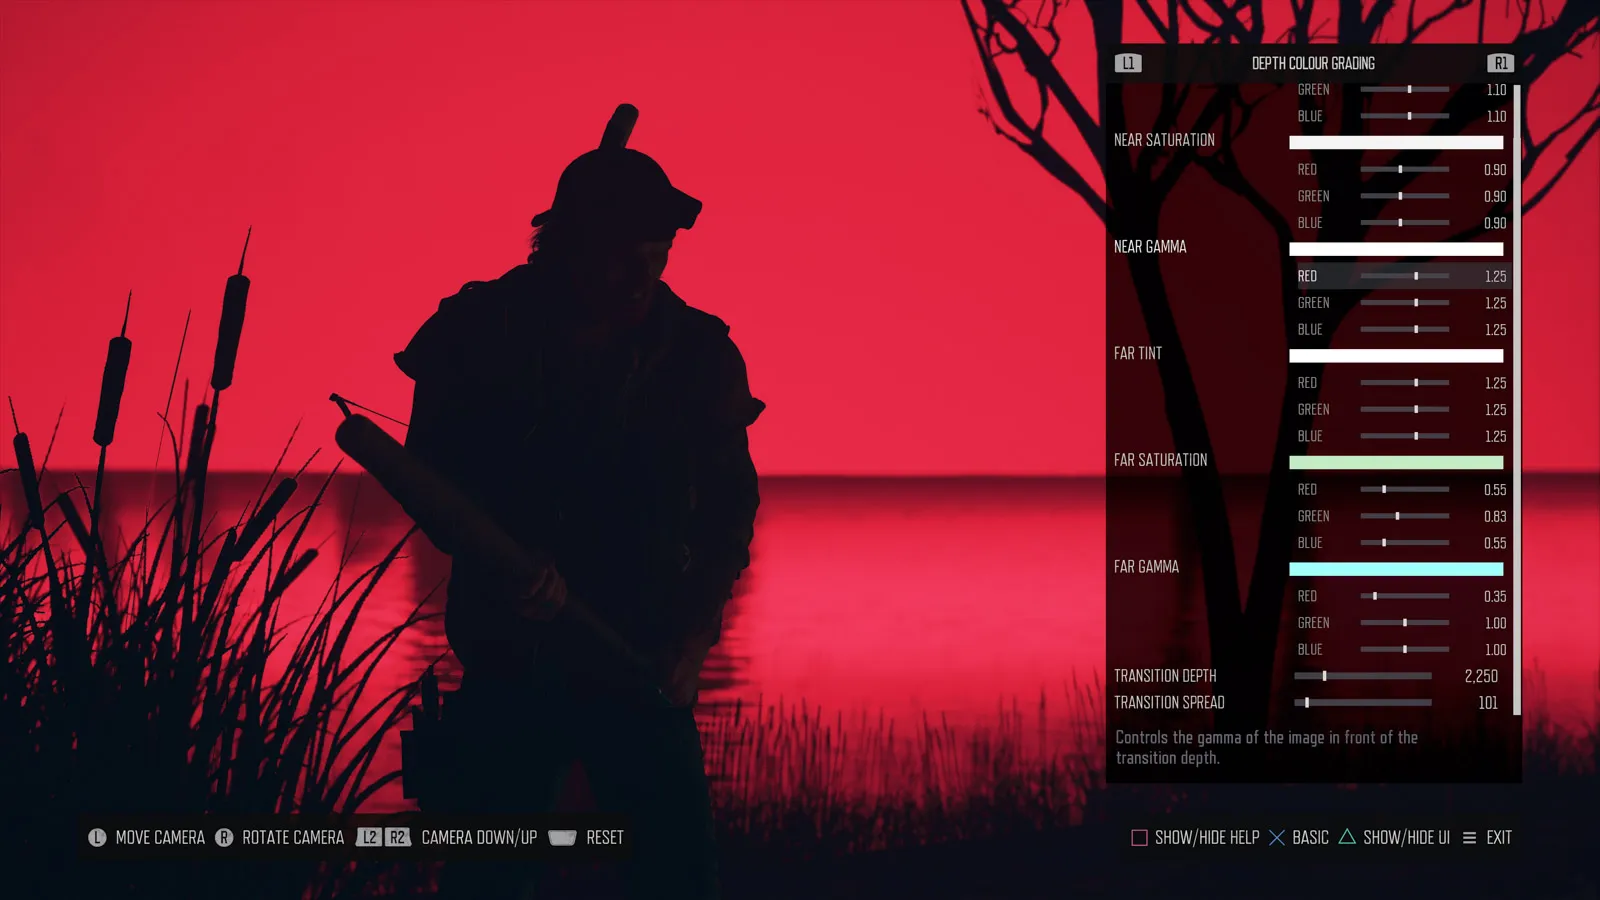
The dedicated lighting options have been added to the photo mode's Advanced colour grading section. Before going into more detail, I'd actually say that the majority of that Advanced mode – which carries over from the original release – simply has too many options.
There's no doubt that the myriad of RGB sliders for toning, gamma, gain, and offset can make some powerful adjustments, but intuitive they are not. To avoid getting bogged down with them, I recommend ignoring all but a few key settings like temperature, brightness, and saturation before heading straight over to the lighting tab.
Natural Light
First up on that new tab is a single time of day setting that loops through a full 24-hour cycle in 30 minute steps. With this, you get a complete day-night transition and it's well worth at least one pass through the day to find the best natural light as a starting point.
Pay particular attention to how the direction of light changes across the scene and how it falls on the subject. The right light can add depth and dynamism while also serving as a strong basis for adding custom lights with a more natural look. Alternatively, setting the clock to nighttime and finding a dark spot is perfect for shots that rely entirely on a custom setup.

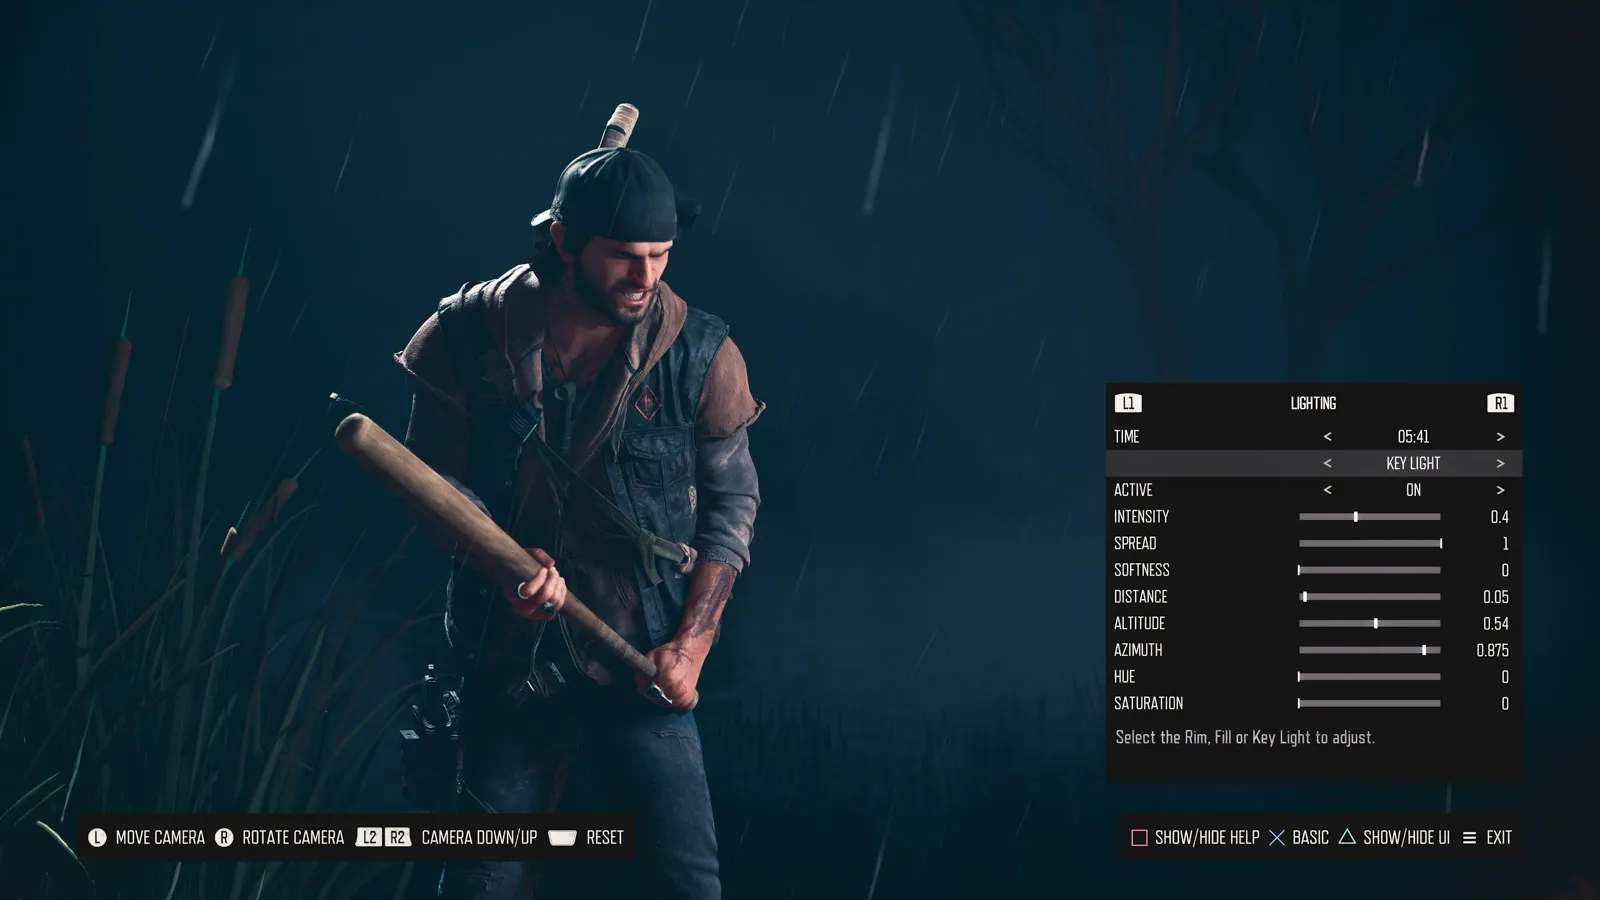
Custom Lights
All other settings on the lighting tab relate to those custom lights and 3 of them can be activated and setup individually. The 3 lights are conveniently called Key Light, Fill Light, and Back Light and are spawned in just about the right locations around the character to do those jobs.
There's nothing to say that you can't just use the default setup, and it will at times improve the standard scene, but be aware that every shot will benefit from slightly different lighting in some way. At the very least, you should be adjusting the intensity of each light as they are all equally bright to begin with, something that is unlikely to give the best results.
Intensity & Spread
The brightness of the custom lights is easily set using the intensity slider where 0 is off and 1 is maximum brightness. Each light should be set to be bright enough to get the desired effect but not so bright that they cause a loss of detail and blown out highlights.
Remember too that the distance between light and subject will affect how intense the illumination appears to be. Moving a light further away will diffuse its beam and soften the effect on the subject.

Somewhat related here are the Spread and Softness options that affect how widely each light shines. Increasing the Spread expands the cone of light to cover a wider area, while decreasing it narrows the beam to a tight spot.
Softness meanwhile, might be expected to soften the outer edge of the light spot, but not here. Nor does it produce softer shadows as the description in the photo mode suggests. For now at least, this setting just widens the cone of light again and overrides the Spread, ironically with a harder edge on the circular spot. Something not quite right there, I think.
Light Positioning
All of the available lights can be repositioned individually using 3 basic movement options. Note though that the movement of lights is orbital and remains centred on the character at all times. There is no way to change the aim direction of the lamp to directly target another nearby subject for example.
The Distance setting is the simplest and moves lights further from or closer to the character. It does cover a fairly large range, giving scope to include multiple subjects in the same light cast or to add illumination to the background.

Orbiting the character, Azimuth moves the light through 360° on the horizontal plane while Altitude does the same vertically. Combine these to change which direction each light shines from and whether it comes from a high or low vantage point. Notice that the lights will always aim towards the same point, so placing a light higher will result in it shining downwards.

Light Colour
Initially pure white, the custom lights can be set to any colour using the Hue and Saturation settings. These are very much self-explanatory with Hue selecting the actual colour and Saturation controlling how vivid it appears.
When wanting to use a coloured light, either as a vibrant accent or a subtle tonal tweak, be sure to increase the saturation first so that the colour change is visible when picking a hue. It sounds obvious, but without doing this, you'll just be changing from white to white.

3-Point Lighting Setup
As I mentioned at the start, a standard 3-point lighting setup is pretty much done for you when activating all 3 custom lights, but it does benefit from a little tweaking.

The key light is the main feature light and so you should use this to set the primary look of the shot. A reasonably strong intensity is recommended with a position that is in front of the subject, approximately 45° to the side, and above eye level being a good starting point for portraits. Look out for a small amount of light and a shadow from the nose across their far cheek and you should be somewhere near.

Next is the fill light that is intended to gently illuminate the shadows created by the key light. Accordingly, this is placed to the opposite side and set to a lower intensity so that it is not competing with the key or causing flat lighng of the face. It should be just enough to add detail to the shadows without lighting them up completely.
Finally, the back light is placed behind the subject and can be set to quite a high intensity level. Placed face-on, this light would be way too bright and overwhelm the detail in the highlights but from behind, the strong intensity is ideal to create a highlighted rim around the subject.

That's just about all you need to know to get started with using the new photo mode lighting options in Days Gone Remastered then. Feel free to play around with varied setups like adding colours or changing light placements for different results.
You don't even always need to use all 3 lights to create an effective shot.


Subscribe to the regular newsletter for all the latest features from TheFourthFocus.com


Proffus is a 360-degree digital marketing agency in West Delhi, offering business with complete solutions to help them grow and boost their online presence. Our services include digital marketing, social media management, web development & design, branding and more. We believe in building simple, practical, and result-oriented strategies that focus on building strong connections between the brand and their audiences. Our team of experts builds strategies that are easy to adapt for each business. We focus on improving visibility, reaching the right audience, and helping brands grow. At Proffus, our goal is to share ideas that support businesses in achieving lasting success.
The Qatar Airways Doha Office in Qatar is a great place to get help with your travel plans. You can go there to book a flight, change your ticket, or cancel your trip. The staff can also help if your bags are lost or if you want a refund. They assist passengers with special needs or kids flying alone. If you're part of their Privilege Club, they can help you use your miles. You can also ask about passport and visa rules for your destination. This office is useful for both local and international travelers.
Absolutely loved the smooth travel experience! The terminal was clean, well-organized, and the staff was incredibly helpful. What Terminal Is Hawaiian Airlines At HND truly stands out for its efficiency and comfort. Great signage and quick check-in made everything stress-free. Highly recommend flying from this terminal for a seamless start to your journey!
Wondering does Southwest fly to DCA? Yes, Southwest Airlines offers convenient service to Ronald Reagan Washington National Airport (DCA), providing travelers with easy access to the heart of Washington, D.C. Known for its affordable fares and customer-friendly policies, Southwest Airlines at DCA operates from Terminal 1, the airport’s historic yet modernized terminal. Whether you're traveling for business, sightseeing, or a quick getaway, flying Southwest to DCA ensures flexibility, comfort, and value.
The Turkish Airlines IAH Terminal, located in Terminal D of George Bush Intercontinental Airport (IAH) in Houston, offers first-rate amenities to passengers flying with Turkish Airlines. This terminal is well-known for its contemporary amenities and international flight options. Passengers have access to lounges, food options, and duty-free shopping. At IAH Terminal D, Turkish Airlines offers quick check-in, luggage services, and committed employee support. The Turkish Airlines IAH Terminal guarantees a comfortable and easy beginning to your international trip from Houston, whether you're flying to Istanbul or somewhere else.