- Mik Bromley

- Jul 10, 2020
- 8 min read
Updated: Aug 7, 2021

The Last of Us Part II's photo mode is a definite step up from that in the previous game and has been engineered with a pretty helpful workflow in mind that most people should have no trouble using for a variety of virtual photography styles. That said, there are certain limitations and it is not always obvious how to get the absolute best out of the tools available or even the game's content, so here are some of my photo mode top tips to help you take your TLoU Pt II photography to the next level...

Master the orbit camera:
Perhaps the hardest thing to get to grips with in this photo mode is the fact that the camera is tethered to a fixed point on the playable character and can only move in circles around them. As though fixed to an invisible selfie-stick, this can obviously be fairly restrictive but with a bit of creativity, there are still plenty of options when it comes to composing a shot.
Be sure to make full use of the, admittedly limited, vertical crane and horizontal truck adjustment via the LS to change the position of your subject within the frame and play with the length of that imaginary selfie-stick by using L2 to bring the camera in closer to the character and R2 to put some distance between you. The maximum range varies by scene and your surroundings, so always play around in different areas if you are looking for wider shots.


with a little patience you can get somewhere close
Low level shots are especially tricky with an orbit configuration as the camera always wants to tilt back up towards the fixed attachment point. Use the LS to crane fully down and then, while slowly moving backwards using R2 and narrowing the field of view to zoom back in, notice how the camera reacts to the ground and then settles to a slightly lower level as you go. This can be a bit hit and miss depending on the terrain and is far from an ideal solution, but with a little patience you can get somewhere close to the ground level shot you were perhaps looking for.
Choose the right Field of View:
Just like selecting a longer or shorter focal length lens for different shots in real life, changing the photo mode's field of view influences your image in more ways than just zooming in on the subject. A narrower FoV, akin to a longer lens, brings your subject closer but also compresses the scene, making the perceived distance between foreground and background appear shorter and de-cluttering the frame. Use this in combination with a more distant camera position to isolate a subject in a portrait or make use of an interesting background region. Use wider FoV settings when wanting to capture an exaggerated perspective from a closer position, or to give a panoramic view of a vista.

look out for specular light sources to add interest to a defocused backdrop
Get precise focus:
Nobody ever wants to see an image where the intended subject is unintentionally out of focus; not only does it ruin the sharpness of your shot but it can also completely change where the viewer's eye is drawn. With no auto-focus setting in The Last of Us Part II's photo mode, it's all down to you to use the manual focus adjustment on the Depth of Field tab.
Before adjusting the focus distance, it can be useful to first crank up the depth of field intensity to create a very narrow focused region that is more obvious to see as you place it within the scene. If you find it tricky to get the point of focus exactly right using just the preset distance steps, choose the nearest one and then fine tune the camera position with L2 / R2 for that extra bit of precision.

Choose the right Depth of Field:
Much like the field of view options, the photo mode's depth of field setting replicates the use of different real world lenses, or rather different lens aperture settings, to influence the look of your image. The DoF Intensity slider determines how much of the scene appears in sharp focus and controls the amount of defocus that occurs in the foreground and background on either side of it.
Use a high Intensity setting to create a shallow DoF that can remove background distractions and make the intended subject really pop out of the image. Thanks to Naughty Dog's authentic implementation, this will also create a beautiful circular bokeh effect, so look out for specular light sources to add interest to a defocused backdrop.

Use the available light:
Speaking of light sources, it goes without saying that the use of light is perhaps the most crucial aspect of any type of photography, and this game has some truly wonderful light to take advantage of. From pre-calculated indirect lighting and subtly diffuse shadows that give a beautifully natural look, to more dramatic point sources that can create highly contrasting subject illumination, choosing the right light is key to achieving an interesting shot. Always pay attention to the type of lighting that is available to you, work with what is there or go looking for something more suited to what you're trying to achieve. Oh and don't forget about the stunning multi-element lens flare, the character's flashlight beams or the fully rendered reflections in mirrors to add a little something extra.

beautifully crafted environments that tell their own stories
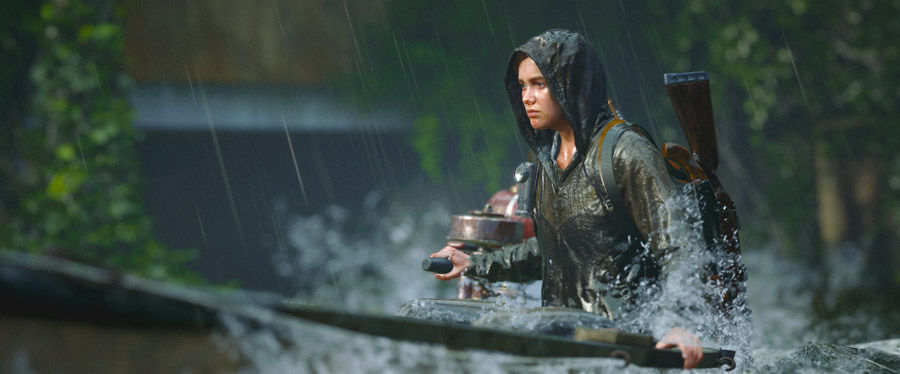
Weather and time of day:
Seattle sees its fair share of wet weather and The Last of Us Part II certainly has that covered. Although the weather and time of day in the game are not dynamic, they do vary by chapter with different sections set amidst different conditions. Not only can you find a variety of lighting in these conditions, but you can also take advantage of the slippery-looking wet shaders by venturing out into the rainy chapters with your virtual camera; that, or just throw your character into some standing water, either way it is a great chance to add a little gloss to your shots.
Get the best character models:
As shown in the cinematic cut-scenes or the Model Viewer found on the main menu, Naughty Dog's character models are amongst the very best, though you won't necessarily always see that during gameplay. Like any game, the level of detail will scale accordingly to maintain performance, such as during a large open battle or while on horseback. Choose quiet scenes in less expansive areas to see the most impressive LoD in the character models and capture the highest quality portrait shots.

While you're there, also remember to manipulate the character's direction of look using the game camera before entering photo mode and to make use of the rich array of idle animations and situational reactions like the way Ellie reacts to water dripping down the back of her neck. These lovingly crafted details will bring more life to your photography.
Ignore the characters:
The character models are not the only thing that you should think about pointing your camera at with beautifully crafted environments and detailed interiors that tell their own stories. The orbit camera doesn't help here but place your character in the intended line of sight, hide them from view via the Filters tab and get involved with the plethora of minutiae that are just waiting to be found.


you might stumble upon something particularly abstract or unique
Use edits subtly:
The Last of Us Part II includes a reasonable set of basic editing options and making use of adjustments such as brightness and saturation is a great way to change the character of your shot. These combine excellently with the various colour filters which can also be toned down to blend with the original image and give a subtle tonal adjustment rather than an overriding colour cast. The Sharpness slider should be used with particular care; while a little sharpness can enhance fine details, too much will result in ugly edge artefacts and exaggerated jaggies. Something to avoid.

Use edits to the extreme:
But wait, you just said... Yes, yes, I know and the above is true when trying to achieve realistic shots but a big advantage of virtual photography is that it lets you conveniently experiment with endless ways to change an image. It is always worth testing the limits of each photo mode setting and discovering how two extremes can combine. Most of the time you'll end up with something that looks disastrous, but sometimes you might stumble upon something particularly abstract or unique. Experiment and see what happens.
Add some defects:
Professional photographers may go to extreme lengths to remove imperfections with low ISO settings to reduce noise and expensive glass to minimise vignette and chromatic aberration, but that doesn't mean you always have to follow the same theory. In fact, making an image imperfect can help to replace that "gamey" look with a bit more realism. Adding a little film grain, especially to shots taken in low light situations, can take away the overly clean look and lend a sense of realism that people are used to seeing with regular photographs.
Similarly, enabling an amount of motion blur enhances the believability of an image. Your eyes know that you do not naturally see a moving object in crystal clarity so, if your shot has movement in it, embrace it with some blur.

Choose the right frame:
Naughty Dog took the pleasing decision to forgo novelty and stick to a range of photographic and cinematic frame crops. These simple two-sided borders are really good at what they do so pick a frame that suits the type of shot you are going for to give it a complimentary format. Offset thirds in landscape orientation - apply one of the wide cinematic crops for that extra theatrical look; a classic portrait (rotated on screen by 90° for full resolution of course) - try the 1.33 or 1.66 crops to better frame the subject.

It is also worth noting that the colour can be changed from black, typically intended to fill space on a TV screen, to white which is great for gallery presentation or a colour matched to the average hue of the image. It's even possible to add transparency when no logo is applied.
Understand logo placement:
On the subject of logos, it can be tempting to plaster every shot with the game logo but it is better to learn the right time to use one. The game branding can lend itself to a more promotional or poster style and can even help to address the visual balance of an image but don't feel like you have to include one every time to identify where the capture came from.
Interestingly, the logos in this photo mode will sit inside the crop frames, as long as they are larger than the surrounding border. If you want them in the border, drop the size down and you'll see them jump across and even switch between white and black for maximum contrast, something that makes me wonder why that wasn't a manual option in the first place.

Use camera collision:
Another area that lets the camera down is that it doesn't let you get close enough to really benefit from the extraordinary details of the game's character models. Ordinarily, even at the shortest camera distance and narrowest FoV, you struggle to get closer than an arm's length away and are limited to little more than a "normal" portrait. However, given that the camera avoids collision with walls and solid objects, you can use this to your advantage to force the camera into an otherwise unreachable position, much like you might do in games without a photo mode to get an unobstructed view.
To do this, get your character near to a wall and spin the camera around into the gap between them. Notice how it bounces forwards to avoid collision and is able to get much closer to your subject than is ordinarily allowed. Precision is out of the window, no pun intended, but the glorious details mean that it's worth making the effort.

Whatever shots you come up with, make sure you get the best quality
A little extra:
Sometimes you can find a little help outside of the photo mode itself and Naughty Dog's industry leading accessibility options have a few extra tricks you can make use of. Not only is there a Camera Distance setting under the game's Motion Sickness options which moves both the in-game and photo mode cameras slightly closer to the character, but with a swipe of the touch pad, you can also apply a high contrast colour filter for novel two-tone shots or put the game into slow-motion, great for timing action shots.

Whatever shots you come up with, to make sure you get the best quality, why not check out my earlier article on The Photo Process: From Capture To Share...

Subscribe to the fortnightly newsletter for all the latest features from TheFourthFocus.com


Kaiser OTC benefits provide members with discounts on over-the-counter medications, vitamins, and health essentials, promoting better health management and cost-effective wellness solutions.
Obituaries near me help you find recent death notices, providing information about funeral services, memorials, and tributes for loved ones in your area.
is traveluro legit? Many users have had mixed experiences with the platform, so it's important to read reviews and verify deals before booking.