- Frans Bouma
- Jun 20, 2025
- 9 min read
Updated: Jun 24, 2025
When it comes to creating our art, we virtual photographers have just a few simple needs: a great looking or inspiring game, and a good photo mode that is capable of getting the best out of its visuals. All too often though, one of those two simple requirements is missing, and typically, that's the photo mode.
What would you say then, if I told you that there’s a universal photo mode out there that can be used with all (well, most) games made in Unreal Engine 4 and 5? A photo mode that works whether the game has native photography tools or not, and that includes all of the features you could wish for and more.
Well, that photo mode is the Universal Unreal Engine Unlocker – in short: the UUU. Developed by me, Frans ‘Otis_Inf’ Bouma, the UUU is distributed via Patreon and, to avoid any wrong assumptions, I should make something clear.
The UUU is a custom piece of software that runs only on a Windows PC. That means it cannot be used on home consoles or other operating systems, even if they are running the same game. If you are shooting on PC though, or just want to know more about what is possible, then this article offers a deeper look into the feature set of the UUU and exactly what you can do with it.
The Basics
So, what can this UUU do exactly? As with every photo mode, it offers a way to control the camera, using keyboard / mouse or gamepad to freely compose your shot. There are no limits like those often found with built-in photo modes: you can move the camera wherever you want, whether that’s during gameplay or in a cutscene. There’s also no limit on how far you can zoom in or out, nor on the size of steps to take: zoom as smoothly as you want.
To be able to take great shots, you of course need to pause the game at the right moment, so the UUU naturally enables that. You can pause the game at any time, run it at a lower (or higher) speed to make it easier to catch the right moment, and even take advantage of something called 'frameskip' to skip ahead a few frames if the frozen moment isn't quite right.
Of course, the mandatory HUD toggle is present, so no on-screen elements will ruin your shot. Neither will low-details, low shadow settings or other choices made for you by the game developer: with the UUU you have access to the developer console in every Unreal Engine game.
The UUU lets you to dump all commands / engine variables to a handy text file that includes help text to describe what each variable does and what values are currently set within the game engine. This makes it easy to tweak a game to your liking with, for example, higher levels of detail and better shadow quality settings.
To take a screenshot you might normally use a button in the built-in photo mode but with the UUU, taking a screenshot is left to either ReShade, the NVIDIA Overlay, or Xbox Game Bar etc. This has the advantage that any effects that you apply through these additional overlays will also be captured in the final image.
Additionally, the UUU doesn’t force you to take a screenshot at your gameplay resolution. Through a feature called 'Hotsampling', the UUU is able to resize the game window – and with that the game’s rendering resolution – to the size and aspect ratio that you specify.
With that resizing complete, you then simply take the screenshot, only now it will be captured at a much higher native resolution than you’re able to use during gameplay. A higher resolution screenshot contains more details and often better textures and shadows.
Let There Be Light
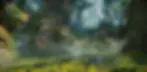
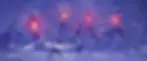
One of the cornerstones of photography is light and with that also darkness. Having control over the light in your scene is crucial to get the shot you want. The UUU therefore offers the ability to create an infinite number of spotlights and point lights, while also making it possible to dim any existing in-game lights for total control of the lighting within the scene.
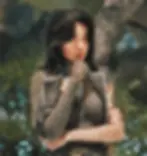
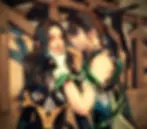
Before any custom lights were added, the scene shown below was pretty dark, like on the rocks that can be seen directly behind Lune. With just 3 custom lights, the light on the character is completely different and transforms how they can be used as a subject for the shot.
All of the options that Unreal Engine offers (the ones that are worth editing anyway) are exposed by the UUU for each individual custom light, giving you complete control over how they affect the scene. This includes shadow details, light colour, temperature, intensity, source length, reflection aspects and much more.
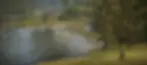
You can even choose whether a light affects the fog in the scene by using the volumetric scattering intensity, as shown in the next example. This can be a great way to add more atmosphere to a scene without a lot of effort.
Post Processing
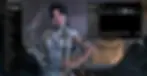
Another important aspect of any shot is colour. Unreal Engine has a lot of different options to fine-tune the end colour of a frame and in the UUU for Unreal Engine 5 most of these options are now available to you too.
In the shot above you see a part of the various controls that the UUU offers for post processing control. Additionally, you can save your settings as presets and load them at will whenever you need them, so you don’t have to set them up from scratch every time.
This isn't just about adding edits to the existing presentation of the game either, it can actually be beneficial to tweak the engine’s post processing before the shot reaches overlays like ReShade. For example, by returning most of the developer's chosen colour tweaks a neutral state, you can give the subsequent ReShade effects more to work with, or rather, less to work against.

Imagine if the scene mostly contains yellow tints and is pretty dark, it’s then hard to make it look very colourful and bright using ReShade alone. This is because the original colours of a surface are mostly lost due to the overly yellow tints and darkness – the UUU lets you recover them.
Create The Scene You Want
The opportunities that a game offers us during gameplay and even in cutscenes can be all well and good, but we’ve all been there: the character looks the wrong way, the monster they’re fighting isn’t big enough or you paused it at the wrong moment. In the old days, or with built-in photo modes, you have no other option but to accept the situation and make the best of it.
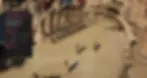
The UUU changes all this through its in-game overlay, offering you full control of the characters and objects in the scene. You are able to select an object in a scene and manipulate its aspects: where it is, how it’s rotated, which animation it is playing (if applicable), its size, and also if you want to clone it to create more.
To make life easier a handy gizmo enables 3D rotation and translation features at the object directly. In the example below, a rib cage was cloned from a location behind the camera, resized, rotated, and moved into view. Of course, this still depends on what is available in the rendered area, but usually there’s plenty of elements available to build a scene that looks different to the one you initially ran into.
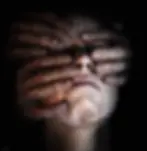
For characters, there are more features available: mesh selection, animation selection, and pose editing. The first two options are currently marked ‘experimental’ as not every game can deal with mesh changes or animation selection.
The feature that isn’t experimental is pose editing. The pose editor of the UUU overlay lets you adjust any bone in the skeleton of the character: position, orientation and size. Additionally, it offers access to morph targets on the character. Morph targets are pre-created transformations of parts of the body or face which can be given a value to have them become more active or less active. Not all games offer morph targets or not all games that offer them have them activated, but if they’re offered, they can be very helpful.
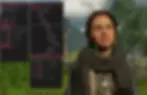
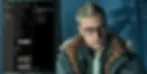
In the shot above the pose editor is shown next to the UUU overlay window. The selected bone in the skeletal tree is highlighted and also visualized with a 3D gizmo, both to show its location and to offer direct editor controls over its orientation and position.
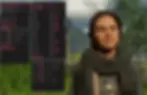
Where morph targets are also available, such as in Hogwarts Legacy, it is also possible to manipulate character features. In this case, the eyes have been rotated and eyelids adjusted so the character looks straight into the camera.
Should you want to re-use a favourite setup, you can also export and import poses, or parts of a pose (e.g. only the face). This offers the ability to quickly create a set of poses, including frames from animation, that can be re-applied again later. The only catch is that the imported pose must be for the same skeleton as that of your current character.
It's worth mentioning too, that once you’re done with your scene and have taken your shot, you can just disable the camera and the UUU will reset everything for you. That includes object manipulation and character posing, so there is no need to worry about cleaning things up yourself when you want to continue playing the game.
The sky is the limit, you can create custom scenes that weren’t possible in-game, like the one below where the two characters both had their pose edited to fit the scene.
Much More...
In case still images weren't enough, the UUU also offers features for videographers. Camera paths allow you to define a route for the camera to take through the scene, following a trajectory you pre-define at the speed you want. If you would rather record video with a natural hand-held camera feel, you can, by using the camera shake controls, while the camera interpolation also ensures that the movement and rotation occurs with no abrupt direction changes.
ReShade effects can then be applied per camera path node using the ReShade add-on IGCSConnector. This extra module allows you to create, amongst other things, dynamic depth of field effects that are automatically applied when you play the camera path. By the way, the recording of video footage is handled by other third-party tools like OBS Studio or the NVIDIA Overlay.
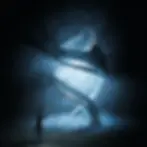
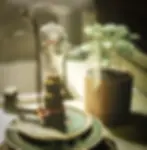
IGCSConnector isn't solely useful for video though, and it enables the UUU to have full support for IGCS Depth of Field – the best depth of field effect for games. An example is shown below, where the transparent glass of the lamp in the front is properly blurred like with a real-life camera. As it doesn’t rely on the depth buffer, it doesn’t run in artifacts and can render transparent surfaces like the one below without issues, as well as properly showing near-plane soft edges which are semi-transparent.
Conclusion
If you’re on PC, and you want to shoot an Unreal Engine game (that’s not online / has anti-cheat), chances are you can use the UUU with it to create amazing shots. The UUU isn’t a free download however, it comes with the subscription (€5) for all camera tools on the Otis_Inf Patreon.
Silly stats: the latest UUU source-code contains over 160,000 lines of code in C#, C++ and assembly in over 350 files and is known to work with over 500 popular Unreal Engine 4 and 5 games.

Subscribe to the regular newsletter for all the latest features from TheFourthFocus.com


